| Product: | Elvis 3 |
| Version: | from 3.2 |
| Booth: | 2015-02-26 |
Summary
The question often arises as to how a background image can be integrated into Elvis 3. To answer this question, the difference between ElvisPage and Canvas must first be clarified, which we will also cover in this document.
The terms
ElvisPage
The ElvisPage is the basis of every operating page. The ElvisPage defines what is shown in the visualization. The properties of the ElvisPage can be achieved by slowly moving the mouse from the outside to the page frame. If it is displayed in blue and bold, one click is enough and the properties of the ElvisPage are displayed.
Canvas
The canvas is located within the ElvisPage and contains all controls. If you click on a control page, you will automatically reach the properties for the canvas.
What does this mean for project planning?
In configuration, the ElvisPage is therefore intended only and exclusively as a recording for the canvas and the controls it contains. Settings that affect the general page size are made in the PageMaster, background colors that affect all pages in the resources.
In the canvas, however, the controls are stored, background graphics are integrated and the operating page is brought to life with bindings.
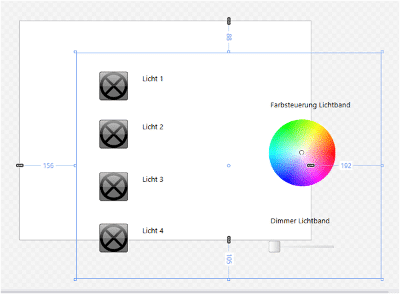
The following illustrations show the effects of moving a canvas within the ElvisPage or extending beyond the edge of the ElvisPage. In Figure 1, all the controls created in the project will be visible. In Figure 2, an unfilled border (white) will appear on the left and top sides of the operator station. The part to be operated is cut off. The ColorSelector and the Light 4 button are not displayed completely, the slider in the lower area is not displayed at all on the operating page.
Figure 1 | ElvisPage and Canvas are on top of each other, all controls are visible at runtime
Figure 2 | ElvisPage and Canvas are also on top of each other, but the canvas is only visible in the area of the ElvisPage at runtime
Avoid positioning the canvas outside the ElvisPage! Normally, the area outside the ElvisPage remains invisible to the user and cannot be operated.
Insert background graphics into an operating page
Foundation
To use graphics, they must first be imported into Elvis. This can be done via the ClientLib or the resources in the respective client project. The storage in the ClientLib allows the use in all client projects of the solution, the storage in the client project (Terminal, Elvis Web or Elvis Mobile) only in the respective project.
Preparation
The import is done in the Client Project or in the ClientLib in the Resources folder.
Right-clicking on the folder with the mouse opens the context menu, in which the item Add -> Add Graphic is to be selected. The graphic can now be selected from the file system. In another dialog, the possibility is given to rename the resource for the project and prepare it for use as a button image. After confirming with OK, the resource is available in the project.
Insert background graphic
The graphic is now dragged and dropped into the operating page. A distinction is now made as to which graphic type is integrated into the canvas.
jpg, png and gif files
If these formats are dragged directly onto the canvas, they are integrated as the background graphic of the canvas. Scaling is done automatically and the image appears in the size of the canvas.
xaml files
When xaml graphics are dragged from the resources onto the page, an image is placed on the canvas. This does not exist as a pronounced background. To avoid the problem of button overlay, images are automatically inserted with a z-index of -1. The graphic inserted in this way can now be adjusted in size and orientation via the properties.
It is important to ensure that the graphic is integrated into the canvas. The graphic can then be adjusted to fit the size of the canvas. The easiest way to do this is through the General – Stretch ->> Fill property.
Be careful not to change the canvas size, but only the size of the graphic dragged into it.


